First Steps - DFactura Portal Previous Validation
This section describes the first steps to follow to start using the DFactura Portal for Electronic Billing with Prior Validation. To start using the system you will first register on the portal in DEMO Environment. The move to production will be managed later with the Projects Area.
Registration and Initial Validation
Registration
This is the first step to start your registration.
- Enter the link: https://demofactura.thefactoryhka.com.co/
- To register you must fill out the following fields:
- Company Name or Name
- Email. As of 10-10-2023, mail handling with the following structure is allowed: ^(([a-zA-Z0-9!#$%&'+=?^_{|} ~_\-\.ñÑ]+)@((\[[0-9]{1,3}\.[0-9]{1,3}\.[0-9]{1,3}\ .)|(([a-zA-Z0-9!#$%&'*+=?^_{|}~\-]+\.)+))([a-zA-Z]{2, 50}|[0-9]{1,3})(\]?)(\s;\s*|\s*$))*$
- To finish, validate the reCAPTCHA confirmation and press the register button.
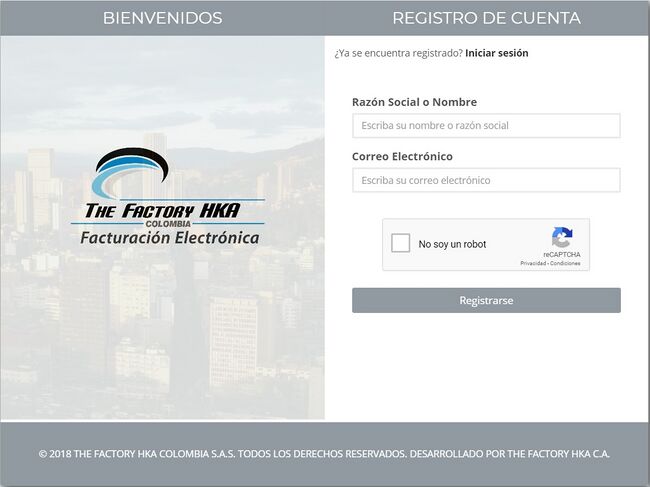
Once registration is completed, a message is generated indicating that an email was sent to activate your account.
Account Confirmation
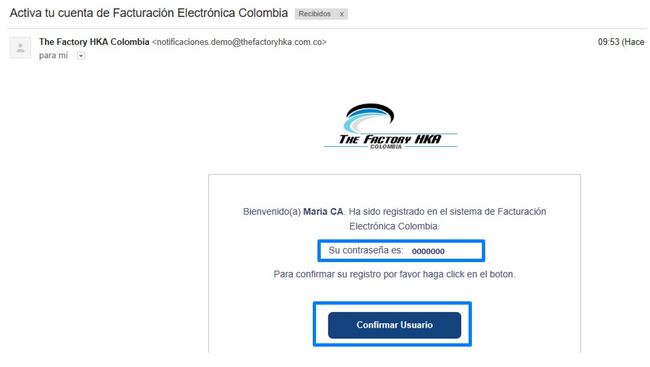
Upon completion of the Registration step, you should receive a confirmation email to the account you added. Please consider the following points:
- The email received contains the password and a Confirm User button which you must click to continue.
- The button will redirect you to the main screen where a message is displayed indicating that the account has been confirmed and that you can log in to the system.
Note 1: You must confirm your account before you can log in. If you do not confirm the account, the system will not allow you to enter.
Note 2: Consider that you have 24 hours to confirm the account, otherwise your registration option will expire.
For more information you can watch the following video
System Login
Please follow the following steps:
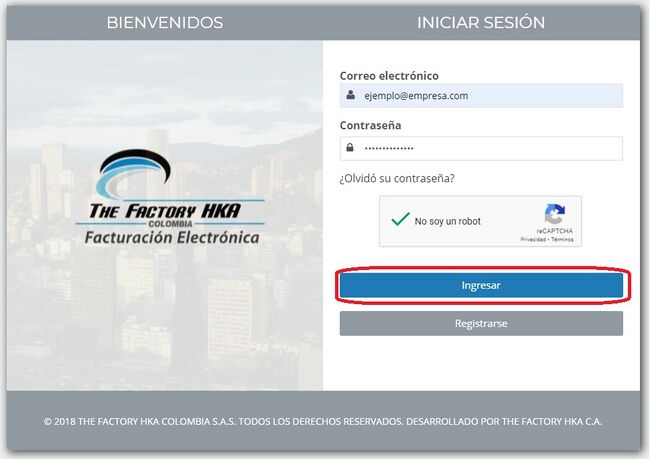
- Enter the link: https://demofactura.thefactoryhka.com.co/
- Enter the email and password received.
- Validate the reCaptcha
- Click Enter
For more information you can watch the following video
Reset Password
In case the user does not remember his password, he can reset it by performing the following steps:
- Click on Forgot your password? on the portal welcome page.
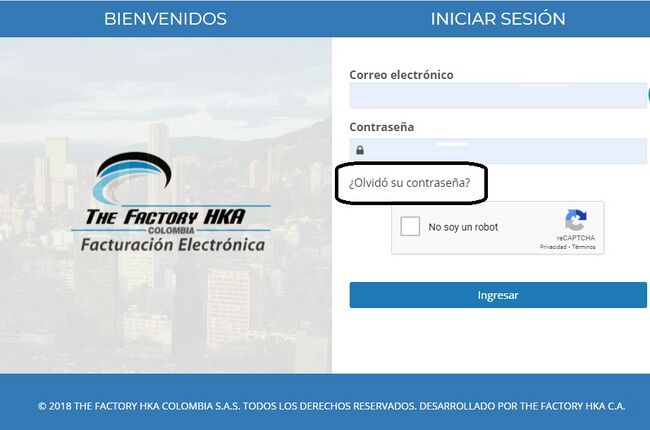
- You will be shown a new screen where you must enter:
- Email you registered with
- Validate the Captcha
- Press the Reset Password button
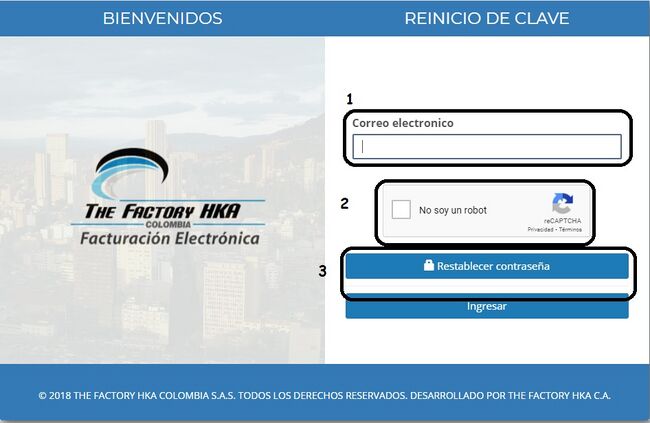
- If the previous step is carried out satisfactorily, the system displays a message indicating that an email was sent to you with the link to reset your password.

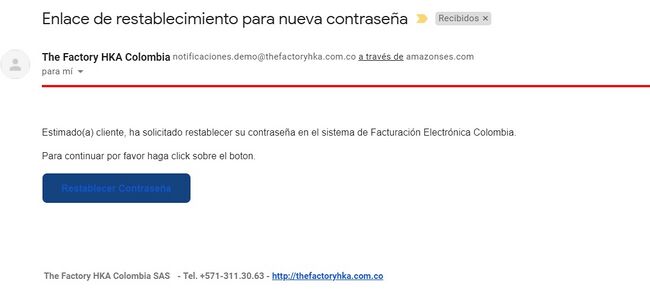
- In your registered email you should receive a message with a link to reset your password. Please in the email received press the button or link that says Reset Password as shown below
- Note: You have 24 hours after receiving the email to complete the restoration process, if you do not do so within this period the system will cancel the restoration attempt and you must do the process from the beggining.
- You will be redirected to a screen where you must enter the following information:
- Registered email
- New Password
- Confirmation of new password
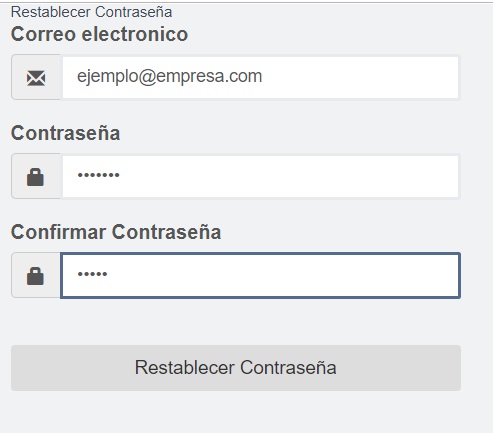
- At the end you must press the Reset Password button. A message will be displayed that the password has been reset and you can enter the portal with the new password configured.
For more information you can watch the following video
Reset Password
In case the user does not remember his password, he can reset it by performing the following steps:
- Click on Forgot your password? on the portal welcome page.

- You will be shown a new screen where you must enter:
- Email you registered with
- Validate the Captcha
- Press the Reset Password button

- If the previous step is carried out satisfactorily, the system displays a message indicating that an email was sent to you with the link to reset your password.

- In your registered email you should receive a message with a link to reset your password. Please in the email received press the button or link that says Reset Password as shown below
- Note: You have 24 hours after receiving the email to complete the restoration process, if you do not do so within this period the system will cancel the restoration attempt and you must do the process from the beggining.

- You will be redirected to a screen where you must enter the following information:
- Registered email
- New Password
- Confirmation of new password

- At the end you must press the Reset Password button. A message will be displayed that the password has been reset and you can enter the portal with the new password configured.
For more information you can watch the following video
UI structure
The home page of the Dfactura portal is made up of four sections.
- A - Main menu: Located on the left side of the screen, you can find the main drop-down menus of the system.
- B - Account information: in the center left of the screen you can find user information, folios and digital certificate, allowing a quick view of the client's information.
- C - Quick Statistics: located in the center right of the screen. It allows you to view quick statistical information about your account, such as documents issued during the current year, number of items in the catalogs, among others.
- D - Header: Quickly shows which Module (Emission or Reception) and which Environment (Demo or Production) the client is in. Please note that a light gray color indicates that you are in a testing environment and a light blue color indicates that you are in your production account.
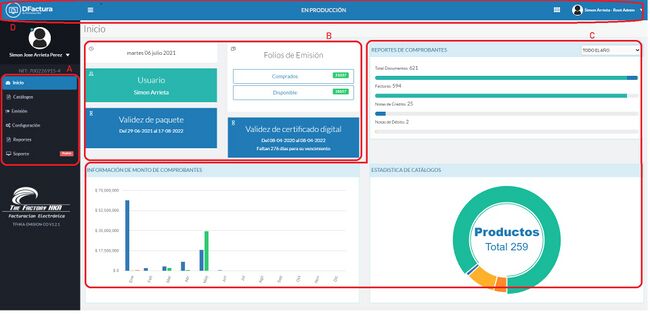
The main menu located on the left side of the screen is made up of the following elements:
All the mentioned accesses are explained in their corresponding sections.
Differences between the DEMO and Production environment
| DEMO Environment | Production environment |
|---|---|
|
|
DEMO Environment
- The DEMO environment is a purely internal testing environment, in this environment the portal configurations are made to learn about the behavior of the system, how clients, units of measurement, products and/or are created. services, establishments, as well as, the fiscal data of your company and the sequential data are configured to test the issuance of invoices, credit notes and debit notes.
- These documents do not travel to the DIAN.
- When creating clients and products it is not necessary to use real information, given that it is an internal testing environment, it is recommended to use your own email when configuring a client, this in order to avoid any confusion with third parties due to so that the test documents that are issued in this environment will arrive at the email indicated at the time of creating the client in the Catalog > Clients section.
- Note: It is important to highlight that the documents issued in the DEMO environment are not the authorization documents.
- If you need to obtain access to the DEMO environment, please follow the steps indicated in the following section
Registration and Initial Validation
Production Environment
- The Production environment consists of 2 stages, described below:
Production in Enabling Process
- In this phase, the authorization documents required by the DIAN are completed in order to obtain approval and be authorized to invoice electronically before the DIAN.
- To carry out this process you have the DIAN Qualification Guide which can help you in this process.
- We must keep in mind that the authorization documents required by the DIAN in this process will not reach the emails indicated at the time of creating your clients in the Catalog > Clients section, but they do travel to the DIAN for your evaluation.
In Production
- In this stage is where we can make our real invoices to our real clients, it is important to define that in this environment all the documents that are issued to your third parties will arrive at the email that you register for each of them when configuring them in the section from Catalog > Clients, likewise, they will also arrive at the DIAN for evaluation.
- If you require access to the Production environment, please follow the steps indicated in the following section
DEMO Migration to Production
DEMO Migration to Production
- From the Project Area it will be verified if you meet the following requirements:
- Billing and Payment Management completed
- Digital Certificate issued
- Registered user on the DEMO Prior Validation Platform. The Factory HKA recommends having tested the different billing scenarios present in your operation in the DEMO Environment.
- Integrated Software House (applies to clients who will invoice electronically through an Accounting System allied to The Factory HKA)
Failure to meet all requirements as listed may mean delays in the process.
If you have all the requirements, you can request the transfer to Production.
To do this you must fill out the following form:
Request to Go to Production
ATTENTION
- You must keep in mind that when performing the Migration from DEMO to Production, the following information IS NOT MIGRATED:
- Customers
- Products
- Units of measurement
- Establishments
- Only migrated from DEMO to Production:
- Tax Data.
- Logo.
- Digital certificate.
